Pages

February 22, 2011

impromptu thank yous!


I have been seeing banners everywhere lately. First, in my paper crafts book, I found a project I intend to start shortly for a wall banner with different prints. A few weeks later, my friend B Head emailed me a project she found online for a banner necklace, but I am waiting for us to get together before I attempt that one. 
Banners somehow just exude happiness to me. I think maybe its because they're springy and bright and make me think of being outside in warm weather. So I decided to make up my own banner project!
Inspired as well by my ever-shrinking but still daunting pile of wedding thank-you notes left to complete, I wanted to make an extra-creative thank you for my cousin who is an artist. He gave me an original painting of his and I thought it deserved an extra thanks! 
I recently acquired a set of alphabet stamps (future project coming soon) and wanted to do something with individual letters- huzzah! A banner that spells out thanks!

I started with some paint swatches that I had picked up a while back. They worked perfectly for a project like this when you need small pieces in a variety of colors. The best part is- paint samples are free!
So pick up some in a variety of colors. I went with pastels/dustier colors myself, but that also had a lot to do with the paint samples I already had.

 
I created a banner template on a piece of cardboard. Mine is about the size of a postage stamp. I traced on different colored paint selections and cut them all out. Then I laid out the flags and rearranged until it was just right. I stamped each one with each letter.
After the banner was laid out and stamped, I looked for a card for attach the banner too. The first card, a square shape, wasn't wide enough for 6 letters (something to keep in mind if you try this yourself) so I found a wider card. I used a natural colored hemp string and glued each end to the back of the card, leaving a little slack in the string. I glued each letter to the string and glued down the bottom point as well for a little security.

Here is the final result:


 I think it looks pretty cute on the patterned card, but would also look great on plain card stock, or with a more natural background.

If you want to make this at home, you'll need:
A blank card
Paint samples in coordinating colors
String (colored embroidery floss would also be cute!)
Alphabet stamps or a marker and good handwriting
Mod Podge or some other type of glue

This was a quick and easy project you can make with materials you probably already have at home, or those you can find for free/cheap. Try it at home! You could make one to express thanks, or love or maybe use it for an invite. Let me know if you come up with anything great!

February 17, 2011

sprucing up the walls!

The problem:
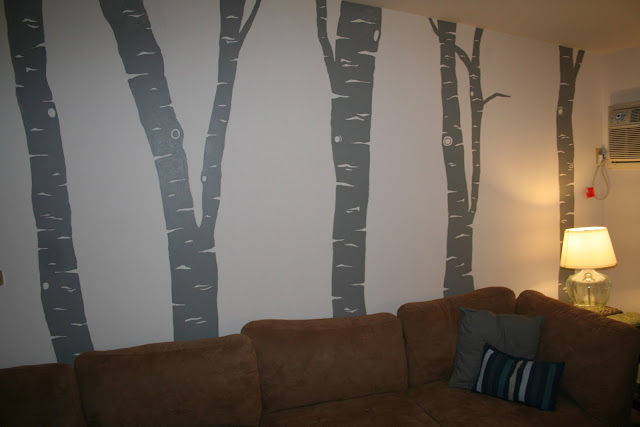
My apartment walls were plain and boring and they needed a little excitement! I thought about a photo collage but was having difficulty figuring out how to make it happen. Then my thought process moved on towards wall decals. There are so many cute options out there for wall decals, but finding them on a large scale can be quite pricey. The ones I was interested in, mostly floor to ceiling trees, were running about $90 for a set, and none of the sets had the height of my peaked ceilings for enough trees to stretch across the wall space.
The solution:
I am a pretty decent free-hander (as long as I have something to copy) and can color in the lines with a paintbrush, so I decided to paint the trees on the walls.


I found a picture of some wall decals on Ebay (Etsy is another good place to look!) and created my design based off of that. I liked the simplicity of birch trees, because they look really awesome and it made the project less overwhelming. If you're going to try this at home, pick a more simple motif if you're not an ultra-skilled artist.

I traced the outlines of the trees in pencil (always pencil so you can erase!) and then headed out to Lowes. It ended up taking 2 sample size containers of paint to fill in all of my trees. $4 and 6 hours later, I ended up with these!


If you want to make this at home, you'll need:
an idea! use a wall decal or something from your head
a pencil with a good, non-smudging eraser
paint in the color of your choice (I recommend buying a matte finish wall paint sample because the color selection is unlimited! match it to a favorite toss pillow or lamp shade- anything!)

Good luck and happy crafting!

February 11, 2011

chiffon flowers

Welcome to the flowery goodness how-to! 


Fabric flowers are everywhere and that is because they are so darn cute. Whether you put them on a hair clip, headband or tank, they seem to automatically spruce up any outfit with their garden party charm. There are plenty of ways to make flowers, but I'm going to include instructions for what I consider to be the easiest! 
You can use any variety of materials for these, from standard cotton to chiffon to thick silk dupioni. I used chiffon this time, because I think that the flimsier fabrics add a bit of whimsy and character to the flowers.

 Find a perfect circle (a lid of any variety will work just fine) and use that as a tracing pattern. I usually fold my material in half and cut through 2 layers at once. You'll want to put a straight pin through the pieces of material so they don't slip and slide whilst you cut!
Cut a number of circles in the fabric (the amount varies based on how the petals expand/how full the petals ought to look). You will use one circle as the base for your flower.


Lay one circle down flat. Take another and fold it into quarters. Put a drop of hot glue in at the point and glue the folded chiffon to the center of the circle. Glue another folded chiffon quarter next to the first, and so on until you have four petals. 

Repeat this process again, staggering the petals slightly. 


 Once your flower is looking full and fluffy, take one more circle and fold it into eighths. Put hot glue in the corner of the fold and stick it in the center. This should, hopefully, complete the look of a full flower.
A note of caution: please be careful using hot glue with chiffon. The fabric is very thin and you can pretty easily burn your hand pressing the petals in. I suggest using a low intensity hot glue gun.


If you want to make this at home, you'll need:
fabric (very little is needed to make just one flower, so a half yard makes quite a few)
fabric scissors (any sharp scissor should work- just remember the duller the scissor the more fraying! uneven cutting will definitely show on these)
hot glue sticks and a hot glue gun
fray check/ no sew glue if you concerned about the edges fraying

Variations: 
Instead of cutting circles, cut a 5-petal flowered shape
Try using 2 different colors, incorporating circles of both into the flower
Use buttons or beads for center decorations

The sky is the limit! Be creative!

February 8, 2011

gold beads and grosgrain

So hobbs lobbs was having a huge 50% off jewelry supplies sale so I definitely stocked up. A few weeks ago I invested in some jewelry making tools and started looping and twirling again, and was dying for more supplies. After my bridesmaids necklaces turned out so awesome (if I do say so myself) I wanted to try the same concept but with something other than pearls.


 The bridesmaids necklaces (pictured left on E Elizabeth) had individual pearls wired together with vintage seam binding. I buy mine from thisgoodday (awesome seller on Etsy) and have always loved the work she does. I strung the ribbon through the jump ring, and had them tie in the back because I wanted the length to vary according to the different dresses. However, for style purposes, I think it looks a little cuter to have a bow in the front of the necklace. I did modify E's with tea-stained ribbon tied in the front post-wedding and it def achieved the look we were going for.

Unfortunately, there really is no way for me to explain via blog how to bead using wires and loops... so I'll just show you what I made. Maybe someday I'll start making charming videos! :)

I strung gold beads with turquoise-ish center beads and wired them together. I liked how the look of the links between spacer beads turned out. I found a grosgrain ribbon that was gold, but not metallic (not an easy task... people are too obsessed with metallics these days).

The nice thing about using the grosgrain ribbon is it was really easy to melt the edges with a lighter to prevent fraying.


This is my final creation. I'm considering posting it to Etsy to see if I get any bites... but that seems a little optimistic. For now, I'll just enjoy learning how to use the tools and coming up with new ideas!

February 7, 2011

monograms and buttons, oh my!

Our couch is massive. It sleeps 4... comfortably. So naturally, we have a serious need for throw pillows. I saw a cute idea I liked for a monogrammed pillow and thought, why not do it with buttons? I have a pretty substantial button collection that was passed down to me, so I already had most of the supplies at home.

I bought a pillow from Meijer. I totes dig the Katie Brown collection so I often check out the home goods section. I found a pillow I liked and traced a lower case g on it with a sharpie. If you are not a good free-hander, perhaps you should try chalk. I laid the buttons out and pinned a few down. A little rearranging was necessary to get a good shape.

Note: it will save time if you do not hot-glue the buttons to the pillow. It will be quick, but the buttons will fall off and you'll just have to sew them on anyway... fail.

At this point, I just sewed the buttons on, one at a time. I did need to rip a hole in the seam to fit my hand inside the pillow, which I stitched back up when I was done. It might be easier to start with a pillow that zips.

It might be cute to try this idea with something other than a letter... geometric shapes? an animal? Or maybe it would be cute to try multi-colored buttons as well?


I think the end result is sort of cottage-y chic.

If you want to make this at home, you'll need:
1 pillow, either one you've sewn or store bought
Buttons
Thread
Needle
Sharpie or chalk

I hope you learn from my mistake on this one and don't waste time gluing, because you'll also waste time peeling all of the glue off of the buttons before you can sew them back on. If your pillows are as well-used as ours, you'll need them to be sturdy!

Happy sewing!

February 3, 2011

a place to hang your pretty things

Hello! 
This is my first blog post of my first blog. My basic plan is to post creative projects as they come to me, so that everyone can see what I've been up to. I'll try to offer helpful hints as well, so you all can try the projects at home! Some ideas I find on other blogs (which I'll include links to, naturally) and some ideas sort of just come to me. So, without further ado and jibber jabber, here we go!

The problem: I needed a place to hang coats near the shoe basket and key rack. I wanted something that would match the adorable key rack my Grandma gifted me, without being overly matchy. I found an unfinished coat rack at Joann's and bought it (with my 40% off coupon, of course). I covered it in strips of newspaper mixed with a water/mod podge paste. In the end, I didn't exactly like the way it looked. I took a very pale gray/blue paint, mixed it with water and white-washed the whole piece. Once it was dry, I pained leaves on it with a subtle gold paint. 

I loved the idea of the shelf on top, since it meant I could decorate the rack however I liked. I found directions for the paper mache birds in a magazine, which are made with cardboard and blown out eggs. I white washed those as well. The bottles were a thrift store find. The word home was unfinished wood that I painted blue, then gold, then sanded the edges so a little blue and natural wood would come through.

I really like the way it turned out, and once we stuck it on the wall, it was as utilitarian as it was welcoming!

If you want to make this at home, you'll need:
unfinished coat rack (local craft store)
newspaper
paint (white-wash color and accent color)
paintbrushes (one for mod podge, one for paint)
mod-podge (I used matte finish instead of glossy)

Good luck crafters!