Pages

June 12, 2011

Jersey Cotton Necklace

Well I am having a fabulous weekend with some of my craftiest friends! B Head and Egan are here and in between our bouts of "hoarders" marathons (which also brought on a few cleaning binges for me) we decided to get a little crafty!
After creating a few foam coozies... (which were def not blog-worthy) we moved on to greater things. B Head showed me an amazing necklace she made out of an old t-shirt. Because it's made of jersey cotton, it is remarkably light-weight for large necklace. The best part is, of course, if you have an old t-shirt to re-purpose, the cost is FREE
But mom! I just want to help!

Dislaimer: Tucker really wanted to be our little "helper" for this project and pretty much attempted to chew everything we were working on, so he'll be making quite a few guest appearances because we could not get him OUT OF THE WAY!

Ok back to the craft! First, find an old t-shirt. I used a plain one but you could try a patterned one as well. Lay the tee out on the floor. Cut off the hemmed edge on the bottom. Then, begin cutting 1-inch strips straight across. Do not cut the side seams-- you'll want to end up with loops of fabric.


Taking the loops in both hands, stretch out the strips of fabric, like so. Place the strips around your neck and arrange them how you'd like them to be. You can keep some longer and some shorter for variety or keep them the same length. Once you've got it figured out, wrap your fist around all of the pieces and take it off of your head to hold it in place. Using another strip of fabric, wrap it around the strips and tie it to secure. Then you're done!
Here's mine... in gray... no surprise.

Here is B Head's... in turquoise... which is awesome.

This project takes about 10 minutes and makes a eye-catching accessory. Save it for a rainy day or whip one up on your lunch break! Happy Crafting!

June 6, 2011

Easy, Peasy Drink Tags

Life is crazy and busy and beautiful all at once, as per usual, but I am going to continue to strive to keep up these posts! I have been working on a few things lately waiting to be posted. I recently walked about 30 blocks checking out a super neighborhood-wide yard sale in Chicago hoping to find some gems, but alas, it was to no avail.
The good news is, there are a couple of weddings coming along that will hopefully involve some fabulous DIY projects to post.

The first wedding, my friend Beth's, is set for July. And it is going to be fabulous.
The setting: a rustic farm in Oklahoma
The color scheme: turquoise and yellow
The decor scheme: whimsical, country and colorful 
 The first project: adorable drink tags.

The basic set-up for the drinks at the wedding will be something like this: 4 different drinks in large pitchers (like this one that I found at Bed Bath & Beyond) all displayed on the table. We'll put bunting on the edge of the table in turquoise and yellow. Because there will be a variety of drinks, we decided they needed labels! 


I created a template on plain paper and after some drawing, folding and redrawing I had an even shape for the signs. This would maybe be easier if you had those tracable shapes they sell for scrap booking. I didn't though, so as usual, I just made it up.
Once I had the shapes cut out, I made up an oval template that would fit nicely. Then I tested out a few sharpie and paint colors. In the end, I went with paint despite the fact that it's more time consuming because the color match was more exact. 

If you have awesome handwriting, you could just go for at this point. I, however, have what has been classified as "boy hand-writing" so I have my own little trick. I either pick a font I love, or find a free one online and download it. Then I type up everything that I need to write and use that to freehand. If you have terrible handwriting and you can't freehand either, try printing your words with colored ink. Do a practice run first though in b&w just in case!
Once everything is pasted together, use a tiny hole punch for punch a hole in each side and string some embroidery floss or thin hemp through, securing the tags to the drink pitchers. Here is how ours turned out!
These are so quick and easy, you could totes throw them together for a casual yard party. Everyone knows that some cutesy decorations can immediately jazz up your average party!

May 16, 2011

the not-so-dainty jewelry holder

If you are anything like me, you like your jewelry over-sized. I have quite the jewelry collection these days, and sadly, no where to hang them up where they are free from tangles and easily displayed for my perusal. What I needed was a jewelry holder as big and as bold as my favorite Anthro necklaces. Voila!
 After dreaming up a number of different ideas for a jewelry holder that would be both stylish and capable of holding at least 10 lbs, I went to the thrift store for a scouting trip.
 At the store, I found this used picture. The frame measures just under 3'x3', so I thought it could be big enough to handle my project. I bought the picture for $5 and brought it to the hardware store. The frame was a little dinged up, and I would have considered refinishing, but once I discovered it was actually particle board, painting became the necessary step.

At the hardware store, I found these molding strips. You could just use a thin plywood, but the molding had a nice beveled edge. I measured the inside of the frame, and cut the strips accordingly. (Did you know they have stations with saws where you can cut the wood yourself in the store! Awesome!)

I picked my color scheme to match my room. Since the piece is so big, I figured it could double as wall art (which my bedroom desperately needs... more on that later. I found a patterned wrapping paper I really enjoyed at a local shop called the Paper Merchant that sells specialty papers, then took the paper to Joanns for a perfect color match in an acrylic paint. I went with a matte finish, but you could go for gloss if you wanted to!

Once the frame and molding strips were painted blue, I measured and cut my wrapping paper to fit inside the frame. I also decided what heights to put the molding strips at and marked the spots on the picture with a pencil. I decided (after some epic failing) to cut the paper into 3 pieces and put each in separately. There was some slight gaping between the existing picture and the frame under which I was able to slide the wrapping paper for a more secure fit and total coverage.

 I decided to use an acid-free double stick tape (after staring at the adhesive aisle for about 20 minutes). Because wrapping paper is so thin, I knew that any sort of glue would result in wrinkles in the paper. Placing some tape on the picture, I put the wrapping on in strips, tucking the edges under the frame. I used the pencil markers to make sure the seams in the paper were hidden under the molding. 

After deciding how far apart to space the hooks for the jewelry, I marked every 3" on the strips, staggering the middle strip by 1.5". I made holes over the marks with a nail. If you try to screw the hooks straight in, you risk splitting the wood *no good. 

 
The hooks I found at the hardware store were simple 5/8" hooks, which was appropriate for the width of the wood. I screwed each one into the holes in the wood. (Please note: this is much easier to do with pliers, which we did not have and ended up with red, aching fingers.)
Once all of the hooks were good to go, I glued the strips to the edges of the frame with liquid nails. You'll definitely want to use a similar product for this step to avoid the strips crashing down and breaking your project. Let the project sit and dry for at least an hour, and definitely over night before hanging anything from it. Once everything has set, mount it on your wall and fill it with your loveliest jewelry!

To make this project at home, you'll need:
Old picture frame
Strips of plywood/molding cut to fit just inside the frame
Hooks
Paper for the background
Acrylic paint
Double stick tape
Liquid nails
Nail/Hammer
Pliers

You could try making this with a different frame shapes and color schemes. You could also opt to paint the background, rather than use patterned paper. Make sure to send a picture my way if you make your own!

 Happy Crafting!

May 9, 2011

a bit obsessed with bunting...

I'm not sure what it is about bunting these days... but I just can't get enough of those darling little flags!

 Since Kev and I aren't exactly in the market for high-end art at this point in our lives, (let's be real... even the sale section of HomeGoods can be a bit over-priced) I decided that it was going to be my undertaking to create/find fabulous decor for our little home.

My sister-in-law Emily gifted me this fabulous little book for Christmas this year. Her taste in decorating is amazing and she has created quite a few splendid things herself (guest blogging potential? I hope!). This is my first project from the book, but I'm sure I'll be attempting others in the future.

Step one is finding some fabulous patterned papers from your local craft store, scrapbook store or specialty paper store. You'll notice that I did not end up using all of these, but I'm sure they'll find a crafty home somewhere.

Step two is collecting some thin card board; cereal boxes are a good source. Using a straight edge and ruler, cut a triangle out of the cardboard. Mine is as wide as it is tall, but yours doesn't have to be as long as the angles are the same and the edges are straight! Using your pattern, create as many cardboard flags and you'll want to use. I did eight flags, which made a decent-sized strand. When you have the cardboard ready, trace the shapes on to your paper, cut it out and paste it to the cardboard using modpodge. Use a hole punch to create holes about a half-inch in from the side in the top corners. This is the point at which I strayed from the book a little. Instead of using individual 5" pieces of ribbon to connect the flags, I decided to string them on some jute so the flags would be spread out a little more.

I used leftover 3M hooks to put them up (I used the super cheap kind that come in a large pack for hanging Christmas lights). I put three on an angle to give the look a little dimension and break up the cornery-ness of that area of the room. You could easily just tack loops at the end of the string with nails if you wanted to hang them straight!
If you want to try this at home, you'll need:
Thin cardboard
Ruler/straight edge
Patterned/colored paper
Hole punch
ModPodge
Ribbon/twine/jute
3M mini hooks/nails

First of all, yes, that is obviously Nick Stokes from CSI and I obviously did not want to turn it off to improve the picture because this part was clearly riveting. :)
Second of all, I was happy the result of the flags. I noticed a few flags that were on a sharper angle slid a little, but that is an easy fix with a little glue on the back of the flags.

I am using this a more of a permanent decorative item, but you could easily make these for a party because they are pretty quick and easy to make. They are also inexpensive because most crafters probably have most/all of the supplies at home anyway. Try making them for a party! You could also use contrasting patterned paper/solid paper to make letters and spell something out on your flags.

Let me know how your version turns out!

May 2, 2011

long overdue...

Dear friends and readers,
Hello! I'm back!
I apologize for the unforgivably lengthy hiatus on this poor blog. I suppose I can sort it blame it on Tucker.

Yes, that's right! We are now proud puppy parents and this our darling little boy. He is just over 3 months old and we've had him for about a month. He's fabulous and we love him. However, I will never downplay the amount of work a new puppy requires! Here he is having his first bath.
Anyway, enough about the pup and on to craftier things!


While I've been gone, I've still been working on a project or two! Here is a gift I made for my friends for our trip to D.C. (which was fabulous of course). 

 I bought some little metal jewelry pieces from the hobs lobs for a buck thirty-four for a two-pack! Unbelievable! There were varying sizes, but I chose the 12mm to start because I think that small things are cute. So basically these little metal pieces have a pushed in center that is ready to be decorated with whatever you find and like the look of!


The cardboard that the piece came attached to had an "actual size" square printed on it, which served as a perfect template. I traced the template onto the background patterned paper. Then I cut teeny animals out of an old anthro catalog I had lying around. Using Mod Podge, Dimensional magic, I glued the animal to the background, initial stamped it and then pasted it into the metal piece. I filled in the rest with more dimensional magic, which looks cloudy while its drying. **Note: if you have bubbles in the glue, use a toothpick to drag them to the edge and then pop them.

 This one actually had a small bubble, but since its above the mouth of the fish, I still thought it was slightly appropriate! I put a pearl on this one using my jewelry making tools. I think these square ones can also be turned sideways to make a bracelet. I prefer the necklaces myself, but there's always room to experiment.
 If you want to try this at home, you'll need:
Jewelry pieces found at hobs lobs
Old magazines or any sort of miniature pictures
Alphabet stamps, or even chopped up letters from magazines
Mod Podge Dimensional Magic
A little imagination! 

All in all, I really liked the way these turned out, and proceeded to make quite a few more in different styles. I'm still trying to find a way to print high resolution animal pictures on such a teeny scale, but it's proving to be difficult with my resources thus far. If you find a way, don't hesitate to share with the rest of us!

I will take this moment to say I am rededicating myself to this blog and there will not be such a long wait for more splendid things in the future! I'm sorry and I love you all.

Happy crafting!

February 22, 2011

impromptu thank yous!


I have been seeing banners everywhere lately. First, in my paper crafts book, I found a project I intend to start shortly for a wall banner with different prints. A few weeks later, my friend B Head emailed me a project she found online for a banner necklace, but I am waiting for us to get together before I attempt that one. 
Banners somehow just exude happiness to me. I think maybe its because they're springy and bright and make me think of being outside in warm weather. So I decided to make up my own banner project!
Inspired as well by my ever-shrinking but still daunting pile of wedding thank-you notes left to complete, I wanted to make an extra-creative thank you for my cousin who is an artist. He gave me an original painting of his and I thought it deserved an extra thanks! 
I recently acquired a set of alphabet stamps (future project coming soon) and wanted to do something with individual letters- huzzah! A banner that spells out thanks!

I started with some paint swatches that I had picked up a while back. They worked perfectly for a project like this when you need small pieces in a variety of colors. The best part is- paint samples are free!
So pick up some in a variety of colors. I went with pastels/dustier colors myself, but that also had a lot to do with the paint samples I already had.

 
I created a banner template on a piece of cardboard. Mine is about the size of a postage stamp. I traced on different colored paint selections and cut them all out. Then I laid out the flags and rearranged until it was just right. I stamped each one with each letter.
After the banner was laid out and stamped, I looked for a card for attach the banner too. The first card, a square shape, wasn't wide enough for 6 letters (something to keep in mind if you try this yourself) so I found a wider card. I used a natural colored hemp string and glued each end to the back of the card, leaving a little slack in the string. I glued each letter to the string and glued down the bottom point as well for a little security.

Here is the final result:


 I think it looks pretty cute on the patterned card, but would also look great on plain card stock, or with a more natural background.

If you want to make this at home, you'll need:
A blank card
Paint samples in coordinating colors
String (colored embroidery floss would also be cute!)
Alphabet stamps or a marker and good handwriting
Mod Podge or some other type of glue

This was a quick and easy project you can make with materials you probably already have at home, or those you can find for free/cheap. Try it at home! You could make one to express thanks, or love or maybe use it for an invite. Let me know if you come up with anything great!

February 17, 2011

sprucing up the walls!

The problem:
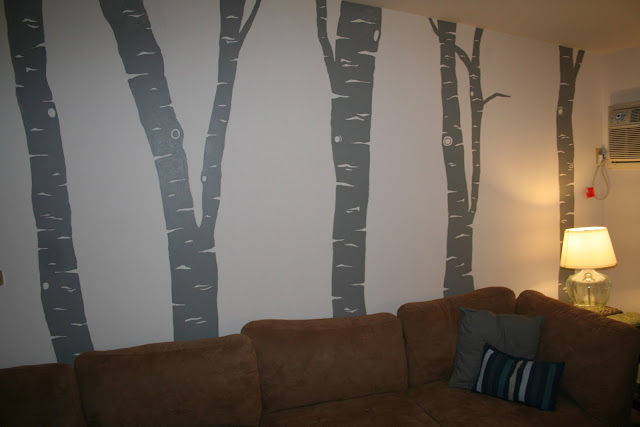
My apartment walls were plain and boring and they needed a little excitement! I thought about a photo collage but was having difficulty figuring out how to make it happen. Then my thought process moved on towards wall decals. There are so many cute options out there for wall decals, but finding them on a large scale can be quite pricey. The ones I was interested in, mostly floor to ceiling trees, were running about $90 for a set, and none of the sets had the height of my peaked ceilings for enough trees to stretch across the wall space.
The solution:
I am a pretty decent free-hander (as long as I have something to copy) and can color in the lines with a paintbrush, so I decided to paint the trees on the walls.


I found a picture of some wall decals on Ebay (Etsy is another good place to look!) and created my design based off of that. I liked the simplicity of birch trees, because they look really awesome and it made the project less overwhelming. If you're going to try this at home, pick a more simple motif if you're not an ultra-skilled artist.

I traced the outlines of the trees in pencil (always pencil so you can erase!) and then headed out to Lowes. It ended up taking 2 sample size containers of paint to fill in all of my trees. $4 and 6 hours later, I ended up with these!


If you want to make this at home, you'll need:
an idea! use a wall decal or something from your head
a pencil with a good, non-smudging eraser
paint in the color of your choice (I recommend buying a matte finish wall paint sample because the color selection is unlimited! match it to a favorite toss pillow or lamp shade- anything!)

Good luck and happy crafting!

February 11, 2011

chiffon flowers

Welcome to the flowery goodness how-to! 


Fabric flowers are everywhere and that is because they are so darn cute. Whether you put them on a hair clip, headband or tank, they seem to automatically spruce up any outfit with their garden party charm. There are plenty of ways to make flowers, but I'm going to include instructions for what I consider to be the easiest! 
You can use any variety of materials for these, from standard cotton to chiffon to thick silk dupioni. I used chiffon this time, because I think that the flimsier fabrics add a bit of whimsy and character to the flowers.

 Find a perfect circle (a lid of any variety will work just fine) and use that as a tracing pattern. I usually fold my material in half and cut through 2 layers at once. You'll want to put a straight pin through the pieces of material so they don't slip and slide whilst you cut!
Cut a number of circles in the fabric (the amount varies based on how the petals expand/how full the petals ought to look). You will use one circle as the base for your flower.


Lay one circle down flat. Take another and fold it into quarters. Put a drop of hot glue in at the point and glue the folded chiffon to the center of the circle. Glue another folded chiffon quarter next to the first, and so on until you have four petals. 

Repeat this process again, staggering the petals slightly. 


 Once your flower is looking full and fluffy, take one more circle and fold it into eighths. Put hot glue in the corner of the fold and stick it in the center. This should, hopefully, complete the look of a full flower.
A note of caution: please be careful using hot glue with chiffon. The fabric is very thin and you can pretty easily burn your hand pressing the petals in. I suggest using a low intensity hot glue gun.


If you want to make this at home, you'll need:
fabric (very little is needed to make just one flower, so a half yard makes quite a few)
fabric scissors (any sharp scissor should work- just remember the duller the scissor the more fraying! uneven cutting will definitely show on these)
hot glue sticks and a hot glue gun
fray check/ no sew glue if you concerned about the edges fraying

Variations: 
Instead of cutting circles, cut a 5-petal flowered shape
Try using 2 different colors, incorporating circles of both into the flower
Use buttons or beads for center decorations

The sky is the limit! Be creative!

February 8, 2011

gold beads and grosgrain

So hobbs lobbs was having a huge 50% off jewelry supplies sale so I definitely stocked up. A few weeks ago I invested in some jewelry making tools and started looping and twirling again, and was dying for more supplies. After my bridesmaids necklaces turned out so awesome (if I do say so myself) I wanted to try the same concept but with something other than pearls.


 The bridesmaids necklaces (pictured left on E Elizabeth) had individual pearls wired together with vintage seam binding. I buy mine from thisgoodday (awesome seller on Etsy) and have always loved the work she does. I strung the ribbon through the jump ring, and had them tie in the back because I wanted the length to vary according to the different dresses. However, for style purposes, I think it looks a little cuter to have a bow in the front of the necklace. I did modify E's with tea-stained ribbon tied in the front post-wedding and it def achieved the look we were going for.

Unfortunately, there really is no way for me to explain via blog how to bead using wires and loops... so I'll just show you what I made. Maybe someday I'll start making charming videos! :)

I strung gold beads with turquoise-ish center beads and wired them together. I liked how the look of the links between spacer beads turned out. I found a grosgrain ribbon that was gold, but not metallic (not an easy task... people are too obsessed with metallics these days).

The nice thing about using the grosgrain ribbon is it was really easy to melt the edges with a lighter to prevent fraying.


This is my final creation. I'm considering posting it to Etsy to see if I get any bites... but that seems a little optimistic. For now, I'll just enjoy learning how to use the tools and coming up with new ideas!